Sunday, April 20, 2014

Inspection Of Embedded/Glassed In Chainplates


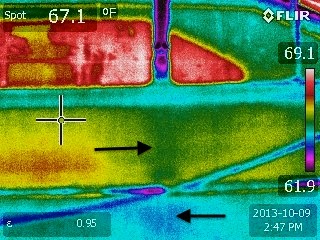
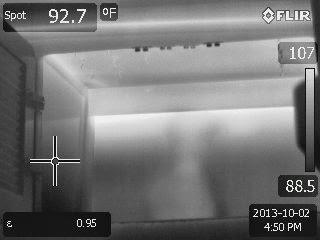
How do you go about determining what the condition of your embedded chainplates are in? There is not a magic window we can peer into. Two options are to X Ray the chainplates and Thermal Imaging. Since I have not seen the X Ray images in person I can not give much comment. From what I have seen posted online, I am skeptical if it can pick up on the hair line cracks that can form in the stainless. With Thermal Imaging we can not see the chain plate per-say, but see the trapped moisture. If salt water is trapped against the stainless then crevice corrosion can begin.

In the January edition of Boat US Seaworthy magazine there was an alert written to inform the boat owner of this type of inspection and the concern of embedded chainplates.

Below are images from an inspection of an Irwin.
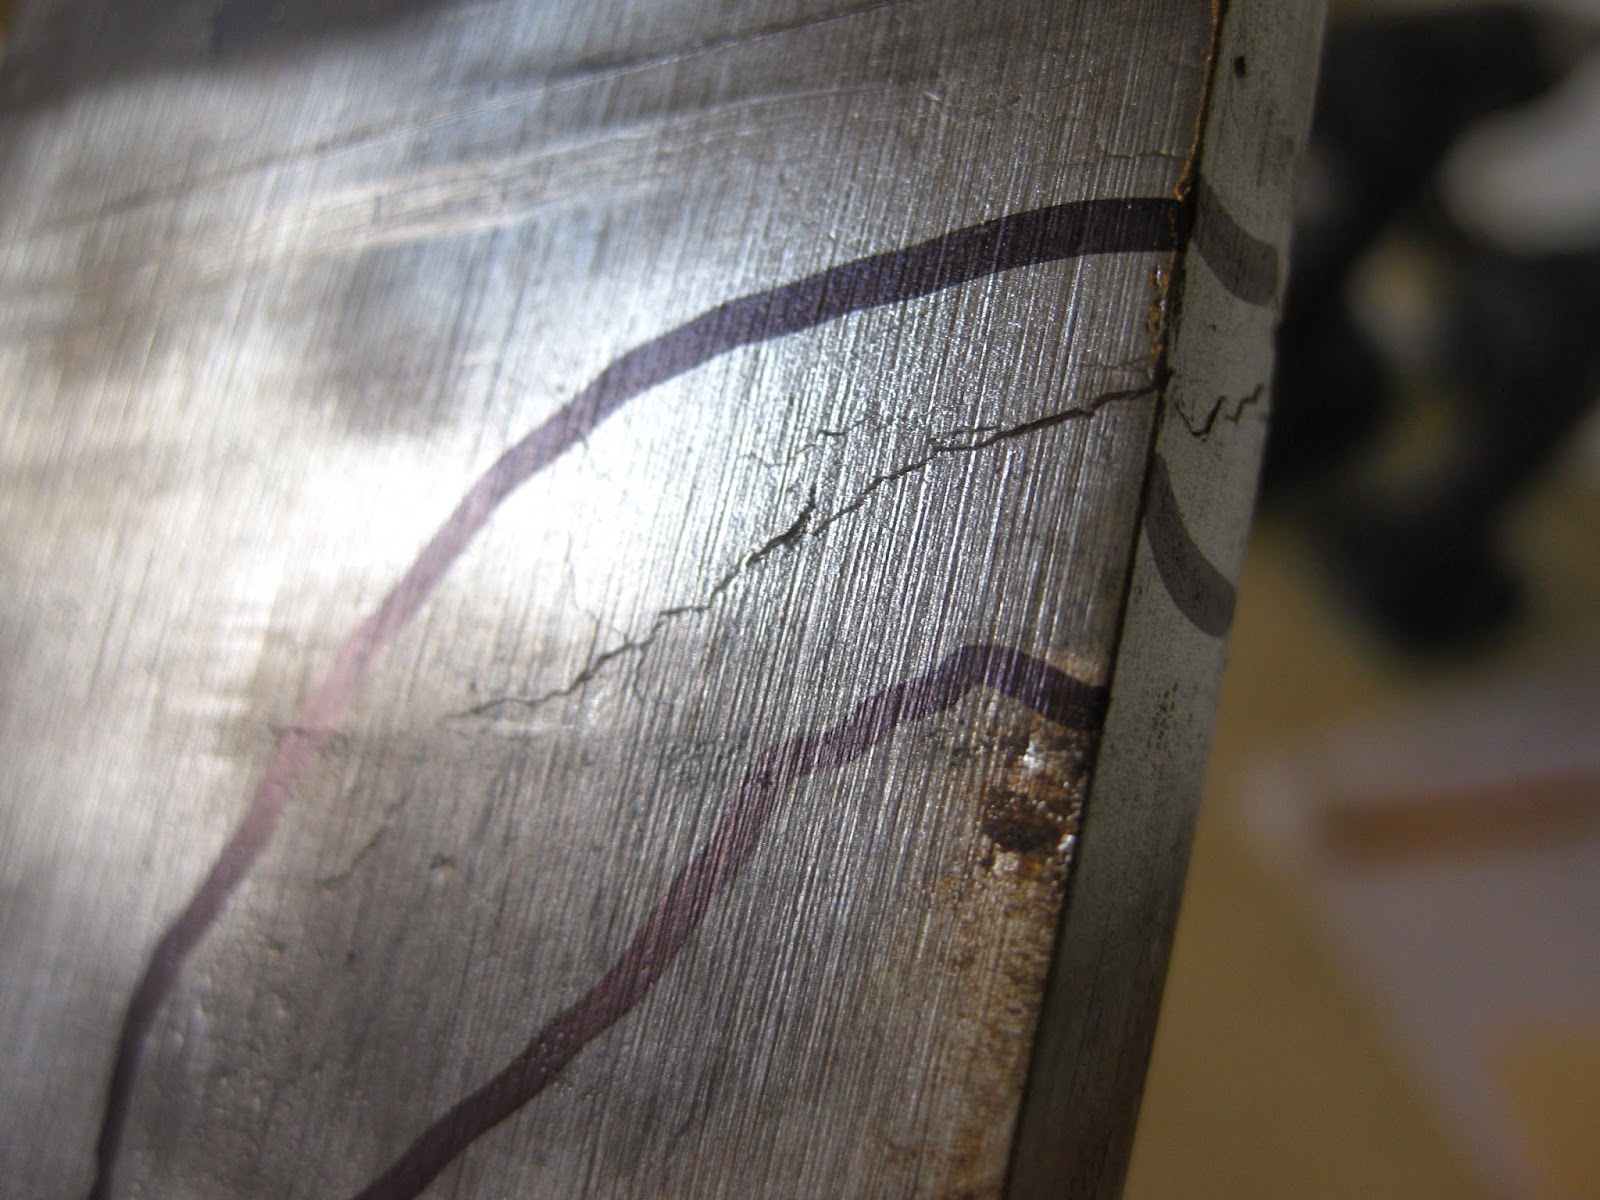
I was able to follow the removal of the chainplates and inspect them after the were removed. Four out of the six suffered from crevice corrosion.  


                                                Trapped Moisture


Cracks:


and then cut in half:


You can see the small amount of good metal left in the chainplate.


I have also done an inspection on an Irwin that had trapped moisture and the owner reported that the chainplates, when removed did not have any corrosion. Most likely this boat had only fresh water trapped around the chainplates.

Image from the exterior indicating trapped moisture.


Link To the Boat US Alert:

https://www.boatus.com/seaworthy/magazine/2014/january/alert.asp

Wednesday, March 26, 2014

Inspection Of Embedded/Glassed In Chainplates Part 2


I wanted to post more photos from the inspection of the two Irwins I inspected in October 2013.


The first step was to take Infrared Images of the area the chainplate is embedded in. Images were taken from the exterior and interior of the boat. This is harder then it sounds, there is a bit an art to take images that will give us the information we need.

 The following are from the exterior:

dbyachtsurvey.com
You can make out the chainplate as it disappears into the hull. The green area and blue areas indicate moisture. A heat source was used in the interior of the boat to help us see the moisture.

In this image the moisture is indicated by the yellow color. This image was taken after the sun had warmed the hull.
dbyachtsurvey.com


The following images are from the interior:

The interior was imaged with the sun warming the hull. Where the sun did not warm the hull I added heat to the surface. You can make out the chainplate behind the liner in the locker.

dbyachtsurvey.com

In the next image we can change the palette to make the trapped moisture more noticeable.
The purple "blob" being the moisture.

This what we can see with our eyes:

No signs of water intrusion.
The above photo is after the liner was removed and the fiberglass was cut away. You can make out signs of water intrusion, but the chainplate does not look too bad. No cracks and very little corrosion was sighted. It is in my experience though that most signs of corrosion are where you can not see.

Below is a closeup of one of the chainplates. This one does not look too bad either.
dbyachtsurvey,com

Here is what one looks like after it is pulled out of the boat. On the side against the hull there was not much corrosion sighted, but I was able to find cracks. One way I could have found the cracks would to have used dye penetrant to highlight the cracks.


We cut one of the chainplates in half, I was surprised to see the amount of metal wastage.


One of the new chainplates being installed.


dbyachtsurvey.com


Encased Chainplate Alert

The following is the alert that was in the January Seaworthy Magazine, that was mentioned in my last post. Thanks to Beth Leonard at Boat US for permission to post it.

Friday, January 31, 2014

The need of keeping water out of the bilge of a steel boat

I always start my surveys on metal boats by using Thermal Imaging of the hull. This helps me locate the structural components of the metal boat. I am also looking for trapped moisture and/or water. If this is found, then there is a good chance there will be corrosion. Next I conduct an inspection of the bilge of the boat, including, anchor, sail, cockpit lockers, and lazarettes. Now I have a very good idea where to concentrate my UTM-audio gauge. I take readings of the whole hull, but will do more readings in the areas of concern.

When I see water in a bilge of a metal boat beyond what might be in a sump I get concerned. I would like to see dry bilges on all metal boats, but this is not always possible. On Tuesday I surveyed a steel trawler. Overall this boat looked to be in fair condition, but then I saw the water in the bilge, a lot of it! There was heavy scale in some areas because of the standing water.  I knew this was an area I needed to spend some time getting thickness readings.

The next day I did my audio gauge. My readings indicated plate wastage. In some areas I could not get a reading that most likely is caused by heavy scale. My visual inspection from inside confirmed the heavy scale. When I arrived at the boat I noticed some weeping from what I hoped was paint blisters. Then an hour later water stared streaming from one of the blisters. Just to think only the paint was holding this section of plate together.

The good news! The boat was out of the water it will not sink. Steel boats can fixed; by cropping out the bad plate and adding new. In a short period of time, she will be underway again.

The moral of this story? If you own a metal boat keep an eye on the bilges.

I will post some photos next.

Tuesday, January 7, 2014

Brrrrrrr!! It is cold!

In the south we do not winterize our boats, so with this artic blast giving a lot of us below freezing temps for over 24 hours, it would be a good idea for all of us to check on our boats and make sure we do not have any freeze damage. Check all hoses, water and waste tanks, bilges, and thru-hull valves.

Stay warm everyone.